
Stay Connected To Your Health
MyUCDavisHealth
Telehealth Video Visits
Connect With a Care Team Member Via MyUCDavisHealth

Chat With Your Health Care Team Virtually Using Telemedicine
Video visits bring the care team to you through the MyUCDavisHealth app and web portal.
Use your smartphone, tablet, or personal computer for access to:
- Pre- and post-procedure care
- Mental health follow-ups and psychology related services
- Diabetes management, pharmacy consultations and reconciliations
- Oncology follow-ups
Note: Video visits can be accessed using Chrome, Safari, or Firefox. Video visits are not available using Internet Explorer.
Preparing for Your Video Visit
To make a video visit appointment:
- Make sure you have a strong and secure Internet or Wi-Fi connection.
- Request a video visit using the MyUCDavisHealth app or web portal by selecting self-schedule, or by calling your UC Davis Health provider.
- If you don’t already have a MyUCDavisHealth account, request access when you contact your provider’s office. They will provide an activation code.
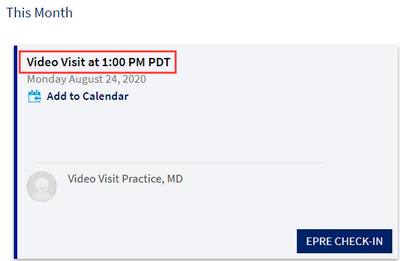
- Up to 20 minutes before your visit, you can use ePre Check-In for paying your co-pay, signing documents, and completing questionnaires.
Follow the steps below to begin your visit using the MyUCDavisHealth app or web portal.
To begin using MyUCDavisHealth, open your browser and visit health.ucdavis.edu/login. Then create a user account or sign in with your existing MyUCDavisHealth username and password.
Note: To ensure a smooth video visit experience, it is highly recommended that you join at least 20 minutes before your appointment to test out your device prior to connecting with your care provider.
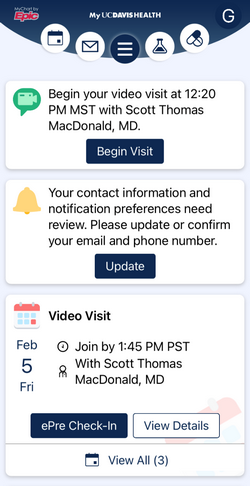
Step 1: Up to 20 minutes before your appointment, log in to MyUCDavisHealth to complete ePre Check-In to pay your copay, sign documents and complete questionnaires. Once you have completed ePre Check-In, click go back, then click begin visit.
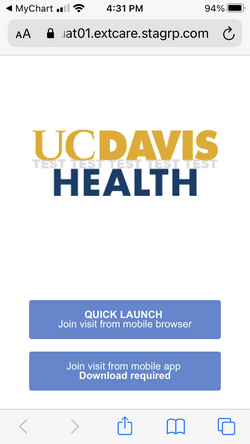
Step 2: Press Quick launch. You will be prompted to accept permissions for your camera and audio, and the system will perform a test of your network connection.
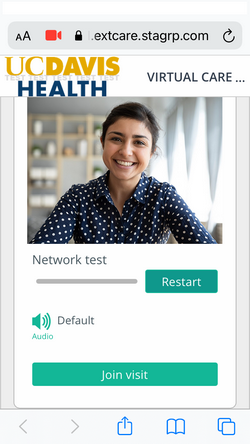
Step 3: Scroll to the bottom of the screen and press Join visit. Rotate your screen horizontally for the landscape view.
You will then enter UC Davis Health’s virtual waiting room, and your care provider will join the video call shortly.
To begin using the MyUCDavisHealth app, search and download from the App Store or Google Play Store. Once downloaded, open the app and accept the end-user license agreement. Then create a user account or sign in with your existing MyUCDavisHealth username and password.
Note: To ensure a smooth video visit experience, it is highly recommended that you join at least 20 minutes before your appointment to test out your device prior to connecting with your care provider.
Step 1: Up to 20 minutes before your appointment, log in to the MyUCDavisHealth app to test your hardware and complete ePre Check-In to pay your copay, sign documents and complete questionnaires. Once you have tested your hardware and completed ePre Check-In, click go back.
Twenty minutes before your appointment, you also have the opportunity to join your visit early by pressing join visit early.
Step 2: Press Begin visit from your profile homepage.
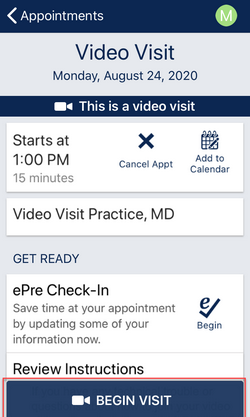
Step 3: Press Begin visit to connect your video call. Rotate your screen horizontally for the landscape view.
If you have previously had a video visit and have already downloaded the ExtendedCare App, you will enter UC Davis Health’s virtual waiting room where your care provider will join the video call shortly.
If this is your first video visit, please go to Step 4.
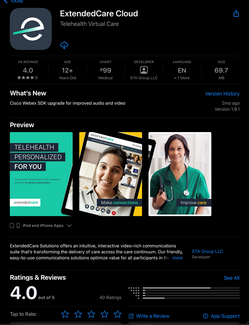
Step 4 (for first-time video visits only): If this is your first video visit, you will be prompted to download and install the ExtendedCare Cloud app on your device. This app will run in the background during your video visit.
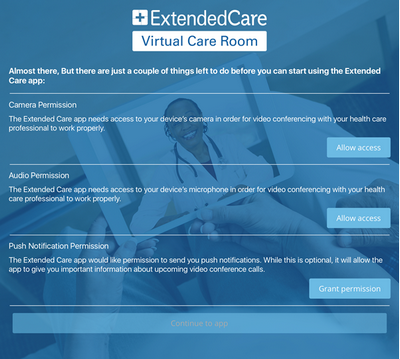
Step 5 (for first-time video visits only): Once the ExtendedCare Cloud app is downloaded, click open. You will be prompted to accept permissions for your camera, audio, and push notifications.
After you have accepted permissions, navigate back to the MyUCDavisHealth app. You will be prompted to activate the free video license. You will then enter UC Davis Health’s virtual waiting room, and your care provider will join the video call shortly.
Visit the MyUCDavisHealth web portal at health.ucdavis.edu/login. Then create a user account or sign in with your existing MyUCDavisHealth username and password.
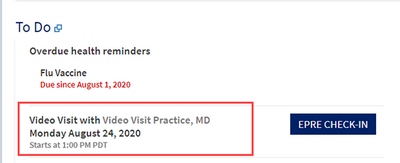
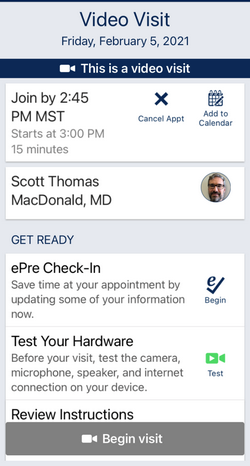
Step 1: Up to 20 minutes before your appointment, log in to MyUCDavisHealth and click the appointment in the to do section on the homepage.
Step 2: Click the appointment to open the appointment details.
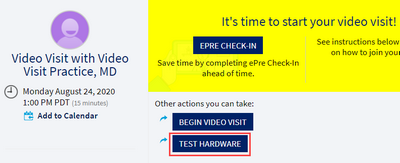
Step 3: Select the test hardware button. A web page will open where you will be prompted to test your device’s camera, microphone, speaker and network.

Step 4: Press Begin video visit to connect your video call. It may take up to 20 seconds for the camera screen to activate. You will then enter UC Davis Health’s virtual waiting room, and your care provider will join the video call shortly.
If this is your first video visit, click “allow access to the microphone and camera” from the pop-up message.
Helpful Tips and Tricks for Video Visits
- Make sure you have a strong and secure Internet or Wi-Fi connection. A 4G or LTE connection works, however you may experience interruptions due to a weak signal.
- Find a place where you can talk freely and avoid distractions during your video visit.
- Eliminate all background noises and mute TVs and music.
- Choose a well-lit area so your care team member can see you. Avoid shaded areas, and don’t sit in front of windows or behind shiny backgrounds as they can reflect light.
- Use your camera to show your care team member medications, rashes or wounds.
- Be prepared with a list of questions to ask your care team member.
Patient co-pays/fees may vary depending on insurance coverage. Please work with the care team member and your benefits provider to determine eligibility.
For questions or access support, call 916-703-HELP (916-703-4357).
Help and Support
Online Help
Have a question about MyUCDavisHealth?
Log In Help
Having trouble logging in?
Contact Us
For additional questions or access support call: